Are your product photos important to the success of your marketing campaigns?
What happens when you combine product photos with marketing campaigns? Your product photos increase your brand awareness, visibility, conversions, reach, and more.
The quality of your products and the credibility of your brand are often judged by the quality of your custom product labels and visual representation. That means having high-quality, beautiful product images that can go a long way.
However, not all online startups can afford to invest in professional photography after hiring the right web designer for a professional website when they are just starting. So today, we will discuss some important points on how to take product photos for your marketing campaigns.
#1. Master Your Lighting
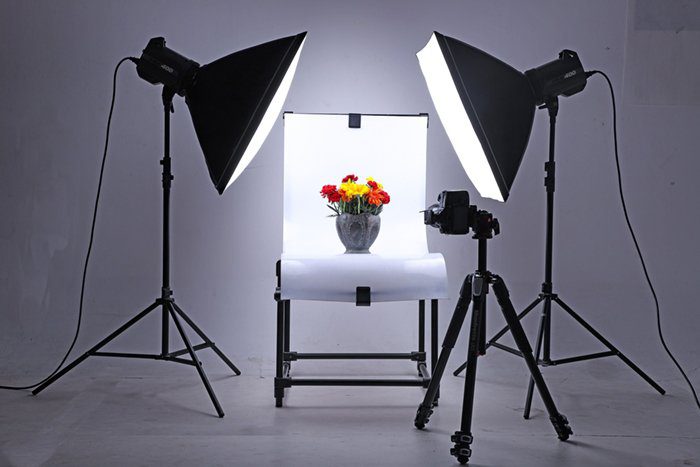
Whether you want to shoot your products indoors or outdoors, get familiar with the lighting first. That is, photography is about finding and applying the right knowledge for every moment.
Let’s look at the two main types of product lighting fixtures you can use: soft lighting and hard lighting. The dim lights create a modeling window to illuminate the subject from all angles. This method will clear up all the details of the product and eliminate any shadows that might obscure the points and edges of the product. This is especially important when photographing 3D objects.
Hard lights add even more contrast between light and image. In complex light, images are more complicated to the edge and more detailed. This method is great for adding metaphors to your vision and, in some cases, can be useful for capturing product photos.
Soft lighting is the most commonly used type of lighting for product photography and can be achieved in various ways.
#2. Set Up Your Background
Finding the right background focuses on the product you’re photographing and helps simplify the model when it comes time to put it into production. Try using a white or clear window, making it easier to remove unwanted material and resize images.
Luckily, you don’t have to spend an arm and a foot on a beautiful background to get the perfect picture. Instead, there are two possible opportunities to do the work.
If you’re going to be photographing, you can order the white sweep off from Amazon. But if you want to make it at home, you can make your broom using a white paper towel.
All you have to do is press the back of the chair against the wall and stick some kraft paper to the wall above the chair, letting it fall to the ground. This will create a clear transition between vertical and horizontal planes whenever you place your product on the chair.
For example, another inexpensive option is to build your lighthouse, also known as a lightbox. It’s a wire box with rotating walls to help create a flashlight around the focus area.
However, if you can’t find a suitable background in time, you can subtract visual settings from photos using a background remover tool. For example, Picsart’s tool can remove distracting backgrounds in a single click.

#3. Set Your Sweep
There are many ways to do this, but the bottom line is to move your rug from the spreader to the table in the right direction. Next, you may need to fold the board to get the desired shape.
In my set, we place the table on the wall and attach the reamer to the wall and table. If you do not have a wall, you will need to connect the back of the box. A few bricks or a block of wood will do.
Center your product on the flat surface of the broom and allow time for your white mirror card to roll out later.
#4. Set Up Your Shot
Investing it on a tripod is generally recommended whether you capture it with a camera or phone. Not only does it reduce judging and blur, but it ensures consistency between images. For example, you can set the camera and turn it off as you go around the product being captured.
Props are also a great way to organize your products and add them to photos. Here’s the golden rule: less is more. The last thing you want is your accessories to be so cluttered that it’s not clear where the product is!
#5. Know Your Angles
When it comes to capturing your products, making the right choice can have a big impact on how a customer perceives them.
Face to face: If the product is worth it, it will usually be the main corner of the image of the product you are looking for.
Bird’s eye: Also known as the 90-degree angle, it’s great for photographing objects lying horizontally, such as clothes, shoes, or pizza, or showing multiple things lying on top of each other.
45-degree angle: Right between the two top corners; this corner is often used to emphasize size.
Create a library on a product page with any number of images. Include photos from different angles, pictures of the product in action, and even a short video to show the product in action.

#6. Set Up Your Product
Now it’s time to put your product into the spotlight. It may seem simple, but setting up your product can take a few attempts to get the angle, lighting, and position right.
Place your product in front of the back wall, ensuring it is centered and on a flat, stable surface such as a table or chair.
You can use a bust that better represents the product for things like jewelry and other accessories. However, for items with labels or special designs, you may need to take some time to adjust the product until it is exactly centered.
Glow dots and accessories to secure small items, such as earrings or necklaces. Mannequins for clothing and accessories. Designs or spectacles for product displays in various directions. A friend or team member tried on costumes or made fun pictures of life.
#7. Go For Quantity
When you’re ready to go, don’t delay! Take lots of product photos. Then, you can turn it off later. Plus, when it comes to organizing advertising campaigns, you thank yourself later!
Remember to rotate the sides of the product images. Include visual images that show the details and functionality of your product. You can also take photos with multiple backgrounds and divide the image into sections in the simulation.
Another way to diversify a photoshoot is to include multiple products in one photo to show variety and how the products complement each other.

#8. Retouch your pictures.
It’s time for post-production now. While hopefully, you’ve already taken a few photos of your favorites, re-editing your photos is a necessary step in the process. This will turn your images from average to professional and ensure that all product images on your website are consistent, vibrant, and organized.
Remodeling allows you to correct color, remove unwanted elements, and adjust the lighting. Sure, it may seem daunting at first, but after you’ve worked on the photo editing program a few times, you’ll be able to get past the process quickly.
Takeaway
Lastly, be sure to write good product descriptions. Product understanding images and information work together to help customers with your products. They also help encourage buying choices to increase sales.
Your goal is to give as much information as possible to force people to buy. Unfortunately, aspiring entrepreneurs often overlook product descriptions. But they are the backbone of the high converting product page – along with beautiful photos, of course.
Read summarized version with